Dev Container로 JavaScript 개발환경 구성
#2 Electron GUI 앱 개발
컨테이너 안에서 GUI 앱을 구동하는 방법은 2가지가 있습니다.
- 호스트의 xserver 공유
- VNC를 통한 화면 공유
이중 개인 컴퓨터에서 테스트가 용이한 호스트의 xserver 공유를 통해 하겠습니다.
컨테이너란?
먼저 호스트 컴퓨터의 xserver을 사용하기 전에 컨테이너 기술이란 무엇인지 알아 보겠습니다.
컨테이너가 무엇인가에 대해 쉽게 와닿지 않습니다. 가상머신과 비교하기도 하는데 가상머신과 컨테이너는 비교하기에 너무 다릅니다.
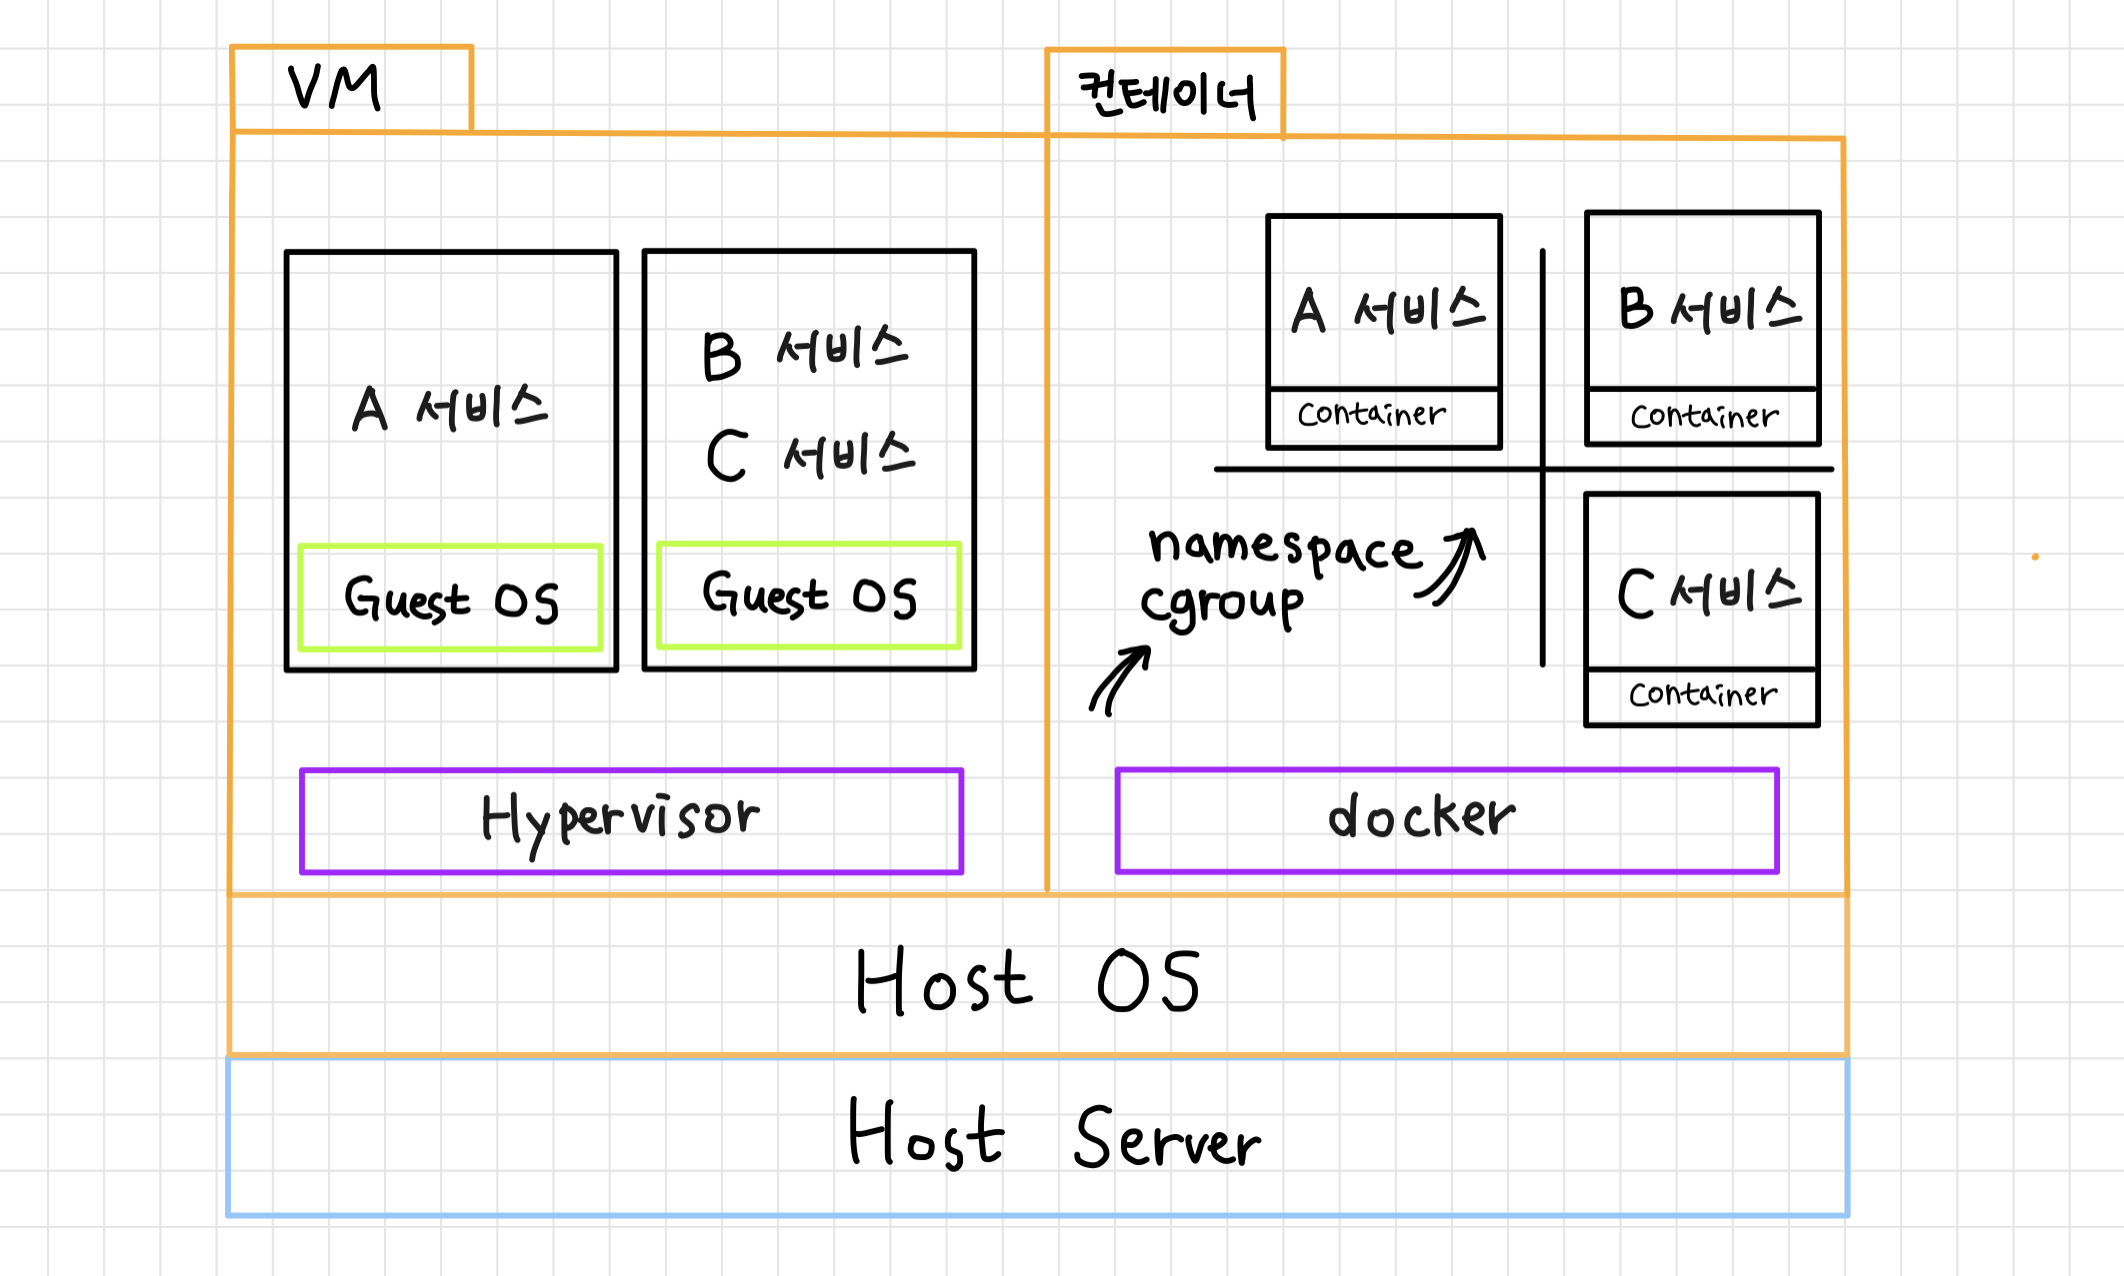
위 다이어그램에서 호스트 서버와 호스트 OS를 제외하고 보면 아래와 같습니다:
(다이어그램 출처 - daaa0555.tistory.com: 가상머신과 컨테이너의 차이)
가상머신은 호스트 컴퓨터 상의 호스트 운영체제 상에 가상 컴퓨터를 생성하고, 가상 컴퓨터에 게스트 운영체제를 설치하고, 이 게스트 운영체제 위에서 서비스를 구동합니다.
컨테이너는 호스트 컴퓨터 상의 호스트 운영체제에서 격리된 환경을 만들고 이 격리된 환경에서 서비스를 구동합니다.
이 격리된 환경은 리눅스에서 제공하는 namespace cgroup를 이용하며 리눅스 커널을 공유하는 격리된 환경이라는 것이 핵심 포인트입니다. 이 격리 환경을 sandbox라고도 하며 아이폰, 안드로이드 같은 모바일 운영체제나 우분투의 snap 등에서 앱 배포 및 실행 단위로 사용되기도 합니다. sandbox는 아이들의 모래 놀이를 위한 모래가 담긴 상자를 말합니다.
가상머신은 생성, 설치, 운영에 느리며 메모리, 디스크, CPU, 전력 등 자원을 점유 합니다. 또한 자원을 미리 예약하여 점유하기때문에 자원 활용이 비효율적입니다.
컨테이너는 운영체제의 격리된 환경이기 때문에 생성, 설치, 제거가 빠르고 가볍습니다. 자원을 사전에 예약하지 않고 필요한 자원만 점유합니다.
도커란?
현재 도커는 컨테이너를 사용하는 기술 중 하나일뿐이지만, 컨테이너 기술의 부흥을 일으킨 기술입니다.
컨테이너는 격리된 환경입니다. 격리된 컨테이너에 호스트의 자원을 제공합니다.
- 컨테이너는 도커 이미지에 기반하여 생성됩니다. 컨테이너 생성시 도커 이미지를 지정해야 합니다.
- 컨테이너에
volumes을 지정하여 호스트의 디스크 자원을 제공합니다. 지정하지 않으면/var/lib/docker/volumes/에 자동 생성된 볼륨이 지정됩니다. - 컨테이너에
ports를 지정하여 호스트의 TCP/UDP 포트를 제공합니다. 지정하지 않으면 포트를 사용할 수 없습니다. - 컨테이너에
networks를 지정하여 네트워크를 제공할 수 있습니다. 지정하지 않으면 자동으로 생성된 디폴트 네트워크가 지정됩니다. - 컨테이너에
devices를 지정하여 장치를 제공할 수 있습니다. 컨테이너가 요구하는 장치를 호스트가 제공하지 않으면 컨테이너는 구동되지 않습니다. - 컨테이너에 환경변수를 제공할 수 있습니다. 환경변수를 제공하지 않으면 기본 값이 사용됩니다.
도커 이미지는 여러 기업들이 제공하고 있습니다. 도커 이미지를 제공하는 서비스를 registry라고 합니다.
도커 이미지를 제공하는 도커 레지스트리를 만들 수도 있습니다.
도커 이미지는 Dockerfile로 부터 빌드 합니다. 도커 파일 작성은 sh을 통한 리눅스 명령을 사용할 수 있으면 작성할 수 있습니다.
이상 도커와 컨테이너에 대해 간단하게 안내해 드렸습니다.
DevContainer에서 Electron 시작하기
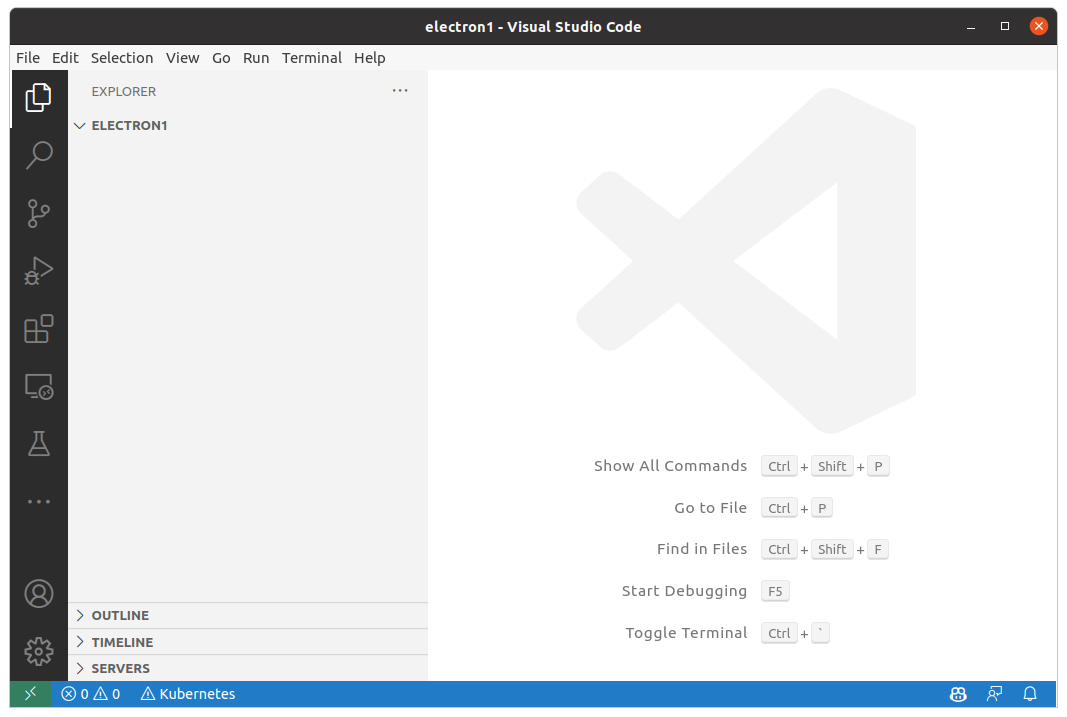
먼저 프로젝트 폴더를 만들고 vscode로 폴더를 오픈합니다.
리눅스:
mkdir electron1
code electron1
윈도우 탐색기의 경우 폴더 열기를 지원하지 않기 때문에 vscode를 실행하고 해당 폴더를 찾아서 열어야 합니다.
vscode는 아래와 같습니다.
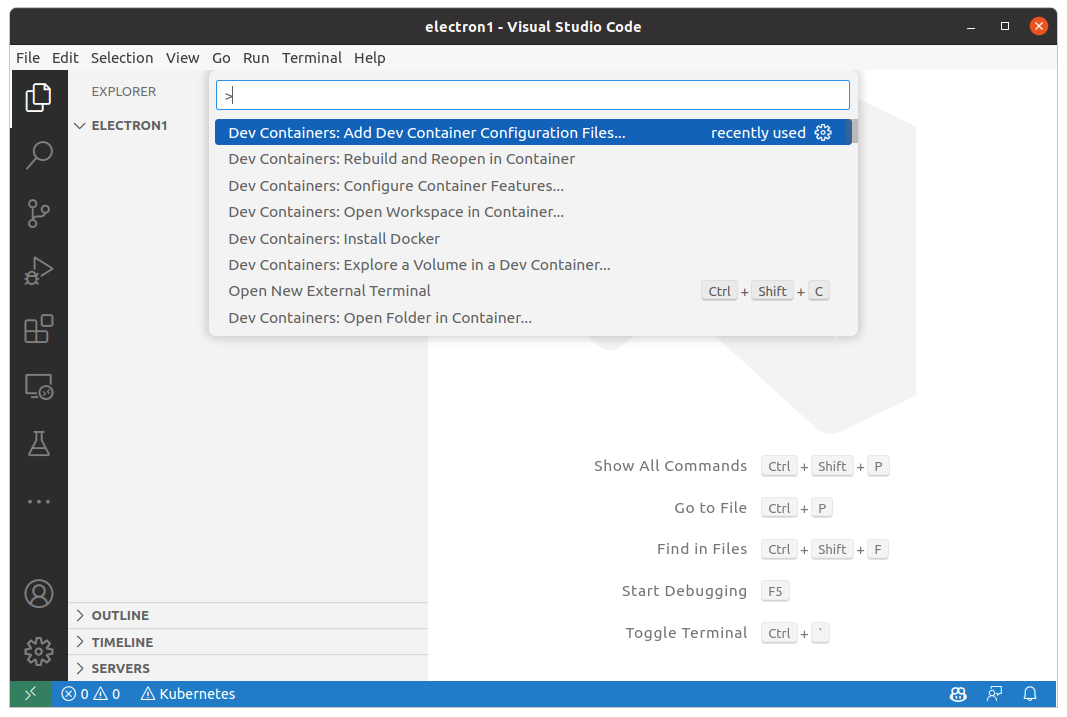
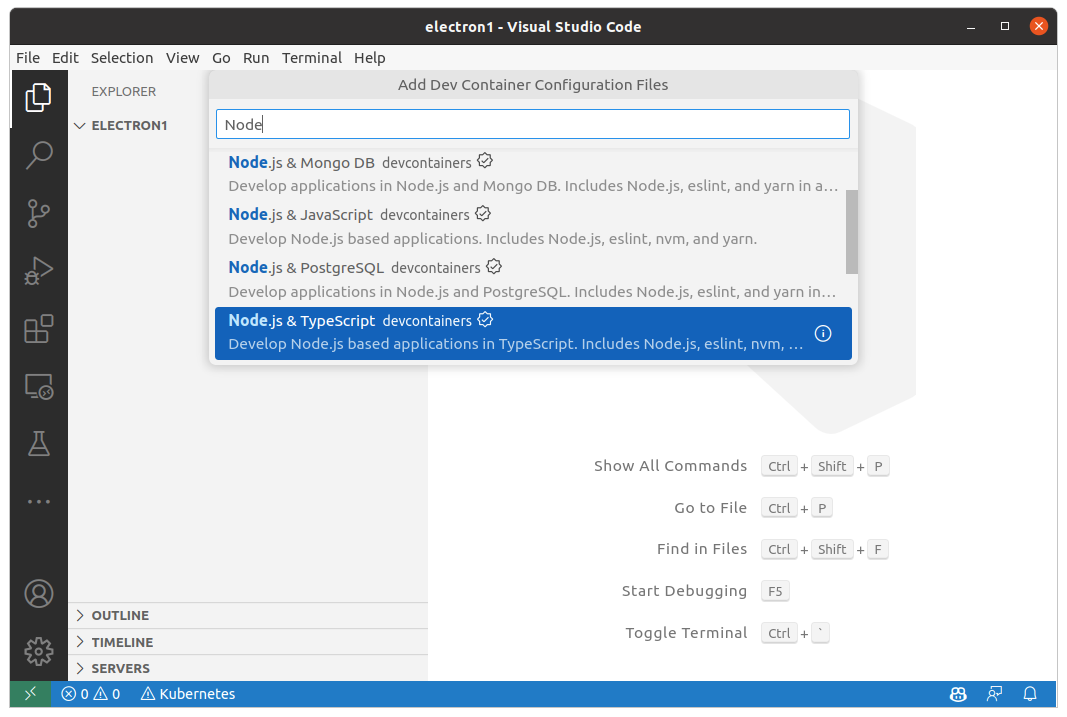
F1 또는 Ctrl+Shift+P를 눌러서 명령 팰럿을 열고 DevContainers: Add DevContainer Configuration FIles...를 실행합니다.
JavaScript와 함께 TypeScript도 사용하기 위해 Node.js & TypeScript devcontainers를 선택합니다.
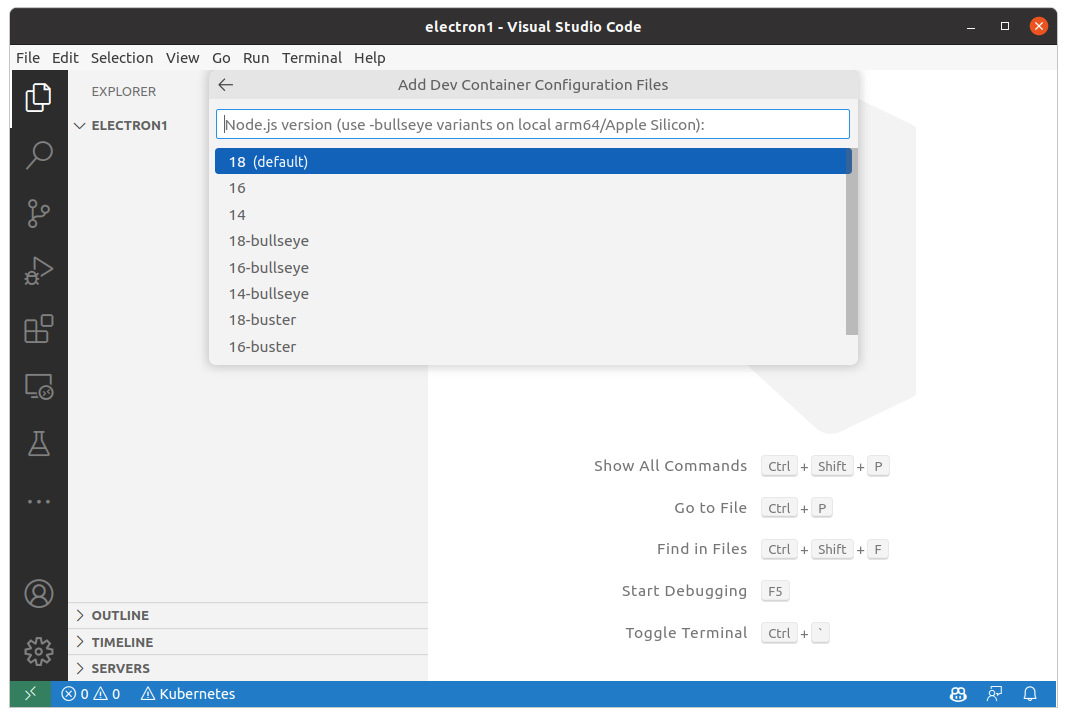
Node 18 버전을 선택합니다.
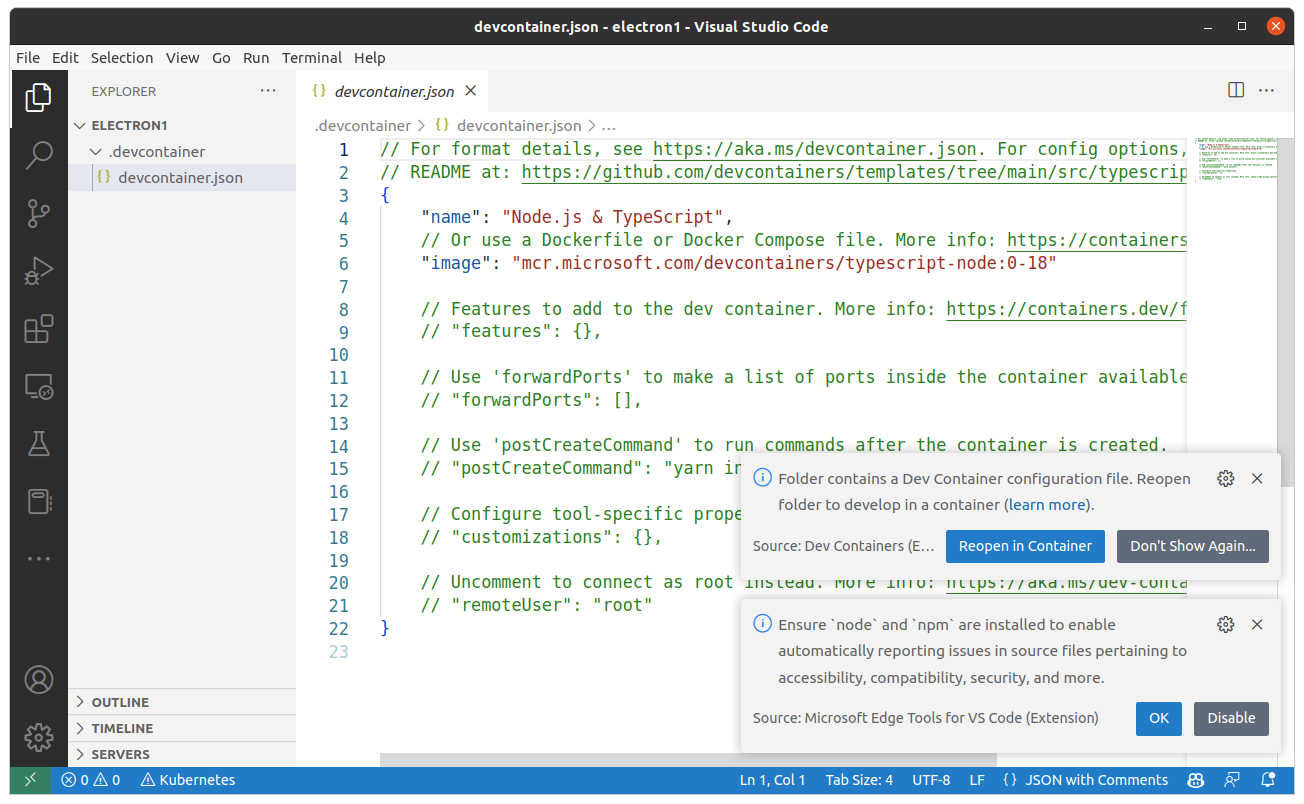
피쳐는 선택하지 않고 바로 OK를 눌러 줍니다.

프로젝트 폴더에 .devcontainer/devcontainer.json 파일이 생성되었습니다.
이제 Node DevContainer를 시작할 수 있습니다.
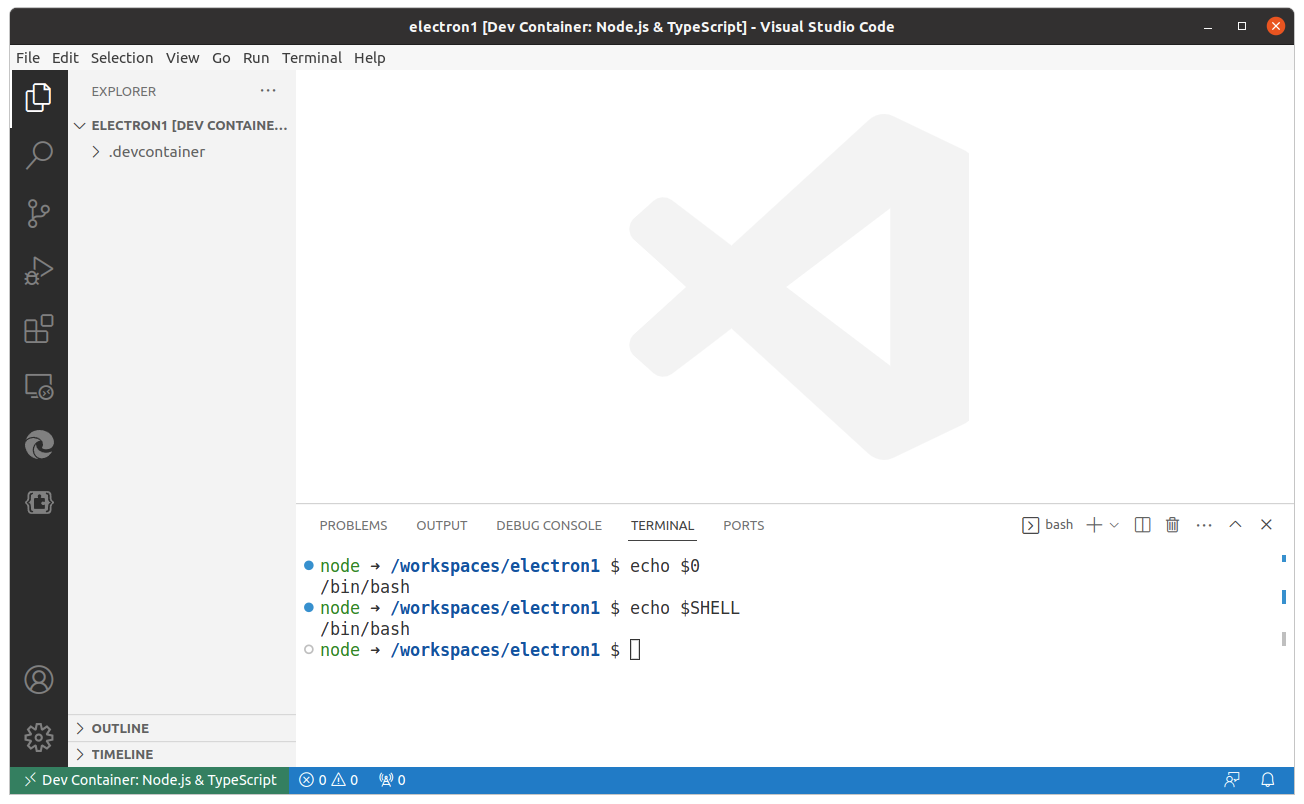
명령 팰럿에서 Dev Containers: Rebuild and Reopen in Container 를 선택하여 컨테이너를 올립니다.

좌측 아래에 Dev Container: Node.js & TypeScript 가 표시되면 성공적으로 컨테이너를 구동한 것입니다.

터미널을 확인하면 컨테이너 안의 bash 셸로 확인 할 수 있습니다.
$ echo $0
/bin/bash
$ echo $SHELL
/bin/bash
$
electron 앱 개발은 공식 튜토리얼에 따라할 것입니다.
node와 npm의 버전을 확인합니다:
$ node --version
v18.14.2
$ npm --version
9.5.0
$
npm 패키지를 준비합니다. 적절한 답을 달아 줍니다.
$ npm init
node ➜ /workspaces/electron1 $ npm init
This utility will walk you through creating a package.json file.
It only covers the most common items, and tries to guess sensible defaults.

See `npm help init` for definitive documentation on these fields
and exactly what they do.

Use `npm install <pkg>` afterwards to install a package and
save it as a dependency in the package.json file.

Press ^C at any time to quit.
package name: (electron1)
version: (1.0.0)
description:
entry point: (index.js)
test command:
git repository:
keywords:
author:
license: (ISC)
About to write to /workspaces/electron1/package.json:

{
  "name": "electron1",
  "version": "1.0.0",
  "description": "",
  "main": "index.js",
  "scripts": {
    "test": "echo \"Error: no test specified\" && exit 1"
  },
  "author": "",
  "license": "ISC"
}


Is this OK? (yes) yes
npm notice
npm notice New minor version of npm available! 9.5.0 -> 9.6.1
npm notice Changelog: https://github.com/npm/cli/releases/tag/v9.6.1
npm notice Run npm install -g npm@9.6.1 to update!
$
생성된 package.json 내용을 확인해 봅니다:
$ cat package.json
{
  "name": "electron1",
  "version": "1.0.0",
  "description": "",
  "main": "index.js",
  "scripts": {
    "test": "echo \"Error: no test specified\" && exit 1"
  },
  "author": "",
  "license": "ISC"
}
$
electron 패키지를 설치 합니다:
$ npm install electron

added 71 packages, and audited 72 packages in 22s

17 packages are looking for funding
  run `npm fund` for details

found 0 vulnerabilities
$
package.json을 수정하여 npm start 명령을 추가하고 저장합니다:
{
  "name": "electron1",
  "version": "1.0.0",
  "description": "",
  "main": "index.js",
  "scripts": {
    "start": "electron . --no-sandbox", <<< 새로 추가한 명령. --no-sandbox가 필요합니다.
    "test": "echo \"Error: no test specified\" && exit 1"
  },
  "author": "",
  "license": "ISC",
  "dependencies": {
    "electron": "^23.1.3"
  }
}
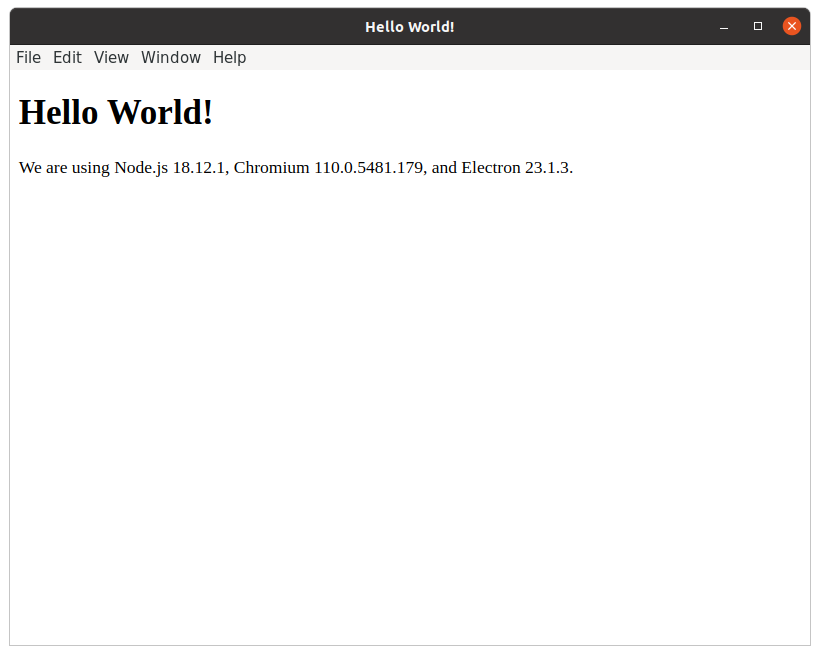
튜토리얼에 따라 3개의 소스코드를 추가 합니다.
index.html:
<!--index.html-->

<!DOCTYPE html>
<html>
  <head>
    <meta charset="UTF-8">
    <!-- https://developer.mozilla.org/en-US/docs/Web/HTTP/CSP -->
    <meta http-equiv="Content-Security-Policy" content="default-src 'self'; script-src 'self'">
    <title>Hello World!</title>
  </head>
  <body>
    <h1>Hello World!</h1>
    We are using Node.js <span id="node-version"></span>,
    Chromium <span id="chrome-version"></span>,
    and Electron <span id="electron-version"></span>.

    <!-- You can also require other files to run in this process -->
    <script src="./renderer.js"></script>
  </body>
</html>
index.js:
// main.js

// Modules to control application life and create native browser window
const { app, BrowserWindow } = require('electron')
const path = require('path')

const createWindow = () => {
  // Create the browser window.
  const mainWindow = new BrowserWindow({
    width: 800,
    height: 600,
    webPreferences: {
      preload: path.join(__dirname, 'preload.js')
    }
  })

  // and load the index.html of the app.
  mainWindow.loadFile('index.html')

  // Open the DevTools.
  // mainWindow.webContents.openDevTools()
}

// This method will be called when Electron has finished
// initialization and is ready to create browser windows.
// Some APIs can only be used after this event occurs.
app.whenReady().then(() => {
  createWindow()

  app.on('activate', () => {
    // On macOS it's common to re-create a window in the app when the
    // dock icon is clicked and there are no other windows open.
    if (BrowserWindow.getAllWindows().length === 0) createWindow()
  })
})

// Quit when all windows are closed, except on macOS. There, it's common
// for applications and their menu bar to stay active until the user quits
// explicitly with Cmd + Q.
app.on('window-all-closed', () => {
  if (process.platform !== 'darwin') app.quit()
})

// In this file you can include the rest of your app's specific main process
// code. You can also put them in separate files and require them here.
preload.js:
// preload.js

// All the Node.js APIs are available in the preload process.
// It has the same sandbox as a Chrome extension.
window.addEventListener('DOMContentLoaded', () => {
    const replaceText = (selector, text) => {
      const element = document.getElementById(selector)
      if (element) element.innerText = text
    }

    for (const dependency of ['chrome', 'node', 'electron']) {
      replaceText(`${dependency}-version`, process.versions[dependency])
    }
  })
터미널에서 방금 만든 앱을 실행합니다:
$ npm start

> electron1@1.0.0 start
> electron .

/workspaces/electron1/node_modules/electron/dist/electron: error while loading shared libraries: libnss3.so: cannot open shared object file: No such file or directory
실행되지 않고 오류가 발생하였습니다. 여러 라이브러리들이 설치 되지 않았습니다. 데비안 패키지를 설치하기 위해 Dev Container를 커스터마이징 해야 합니다.
커스터마이징
.devcontainer 폴더에서 devcontainer.json을 변경합니다.
{
	"name": "Electron & TypeScript",
	// Or use a Dockerfile or Docker Compose file. More info: https://containers.dev/guide/dockerfile
	// "image": "mcr.microsoft.com/devcontainers/typescript-node:0-18"
	// "build": {
	//	"context": "..",
	//	"dockerfile": "Dockerfile"
	// },
	// https://code.visualstudio.com/docs/devcontainers/create-dev-container
	"dockerComposeFile": [
		"docker-compose.yml"
	],
	"service": "electron-devcontainer",
	"workspaceFolder": "/workspaces/${localWorkspaceFolderBasename}",
	//"shutdownAction": "stopCompose",
	// Features to add to the dev container. More info: https://containers.dev/features.
	"features": {
		"ghcr.io/devcontainers/features/docker-outside-of-docker:1": {
			"version": "latest",
			"enableNonRootDocker": "true",
			"moby": "true"
		}
	},
	// Use 'forwardPorts' to make a list of ports inside the container available locally.
	// "forwardPorts": [],
	// Use 'postCreateCommand' to run commands after the container is created.
	// "postCreateCommand": "yarn install",
	// Configure tool-specific properties.
	// "customizations": {},
	// Uncomment to connect as root instead. More info: https://aka.ms/dev-containers-non-root.
	//"remoteUser": "node"
}
변경 내용을 살펴 보겠습니다:
// "image": mcr.microsoft.com/devcontainers/typescript-node:0-18
"image" 항목을 주석으로 막았습니다. 대신 docker-compose.yml 파일을 추가 하였습니다.
	// https://code.visualstudio.com/docs/devcontainers/create-dev-container
	"dockerComposeFile": [
		"docker-compose.yml"
	],
	"service": "electron-devcontainer",
"dockerComposeFile" 항목은 docker-compose.yml을 빌드하게 합니다. 그리고 docker-compose.yml 내에서 사용할 서비스는 electron-devcontainer라는 것을 알립니다.
어느 컨테이너 개발 환경은 Dockerfile 만으로도 커스터마이징이 가능한데
	// "build": {
	//	"context": "..",
	//	"dockerfile": "Dockerfile"
	// },
GUI 경우 호스트의 xserver를 컨테이너에 volume으로 전달해야 하므로 docker-compose.yml을 작성해야 합니다:
docker-compose.yml 추가
docker-compose.yml 파일 내용은 아래와 같습니다:
version: '3'
services:
  electron-devcontainer:
    # https://code.visualstudio.com/docs/devcontainers/create-dev-container
    container_name: electron-devcontainer
    build:
      context: .
      dockerfile: Dockerfile
    environment:
      - DISPLAY=unix$DISPLAY
    volumes:
      - ../..:/workspaces:cached
      # make sure electron access X11 on host computer
      # run first in host computer
      # 'xhost +local:docker'
      - /tmp/.X11-unix:/tmp/.X11-unix
      - /var/run/docker.sock:/var/run/docker-host.sock
    network_mode: host
    command: /bin/bash -c "while sleep 1000; do :; done"
내용을 살펴 보겠습니다.
services:
  electron-devcontainer:
서비스에는 electron-devcontainer 하나가 있습니다. 이 서비스 이름은 devcontainer.json에서도 참조하고 있습니다:
	"dockerComposeFile": [
		"docker-compose.yml"
	],
	"service": "electron-devcontainer",
컨테이너 이름을 보겠습니다:
  electron-devcontainer:
    # https://code.visualstudio.com/docs/devcontainers/create-dev-container
    container_name: electron-devcontainer
컨테이너 이름은 electron-devcontainer로 서비스 이름과 동일하게 하였습니다. 컨테이너 이름을 지정하지 않으면 docker가 랜덤하게 이름을 주는데, 직접 지정하면 별도로 관리하거나 로그인 할때 직접 참조 할 수 있습니다.
사용할 이미지를 보겠습니다L
    container_name: electron-devcontainer
    build:
      context: .
      dockerfile: Dockerfile
docker-compose.yml에서 이미지 이름을 지정하지 않고 Dockerfile로부터 빌드하라고 지정하였습니다.
아래가 xserver GUI를 위한 환경 준비 입니다:
    environment:
      - DISPLAY=unix$DISPLAY
DISPLAY 환경 변수에 화면 번호를 지정하였습니다.
다음은 volumes을 지정합니다:
    volumes:
      - ../..:/workspaces:cached
      # make sure electron access X11 on host computer
      # run first in host computer
      # 'xhost +local:docker'
      - /tmp/.X11-unix:/tmp/.X11-unix
      - /var/run/docker.sock:/var/run/docker-host.sock
../..:/workspaces:cached 호스트의 소스코드 폴더를 볼륨으로 지정하였습니다.
/tmp/.X11-unix:/tmp/.X11-unix 호스트의 x11-unix 폴더를 컨테이너의 볼륨으로 지정하였습니다.
/var/run/docker.sock:/var/run/docker-host.sock 호스트의 도커 소켓을 컨테이너의 도커 소켓으로 지정하였습니다.
network_mode: host
네트워크는 호스트와 동일한 네트워크를 사용하도록 하였습니다. 이것은 필수이지 않습니다만, GUI 앱의 경우 호스트 컴퓨터의 네트워크를 사용하는 경우가 많습니다.
command: /bin/bash -c "while sleep 1000; do :; done"
컨테이너가 시작하자마자 종료하지 않도록 bash를 계속 실행하도록 하였습니다.
xhost 연결 허용
docker-compose.yml의 volumes 항목을 보면:
      # make sure electron access X11 on host computer
      # run first in host computer
      # 'xhost +local:docker'
호스트 터미널을 사용하여 xhost에 docker 연결을 허용해 주어야 합니다:
$ xhost +local:docker
non-network local connections being added to access control list
연결을 제거하려면:
$ xhost -local:docker
non-network local connections being removed to access control list
컴퓨터를 사용할 때마다 입력해야 해서 불편하다면 .bashrc에 추가해 줍니다:
$ echo "xhost +local:docker" >> ~/.bashrc
Dockerfile 추가
Doclerfile에서 필요한 데비안 패키지들을 추가해 줍니다:
FROM mcr.microsoft.com/devcontainers/typescript-node:0-18

USER root

ENV DEBIAN_FRONTEND=noninteractive

RUN apt-get update -y --no-install-recommends \
    && apt-get install -y --no-install-recommends \
    sudo \
    build-essential \
    xz-utils \
    curl \
    ca-certificates \
    apt-utils \
    dialog \
    git \
    xauth

RUN apt-get update -y --no-install-recommends \
    && apt-get install -y --no-install-recommends \
    libx11-xcb1 \
    libxcb-dri3-0 \
    libgbm1 \
    libxtst6 \
    libnss3 \
    libatk-bridge2.0-0 \
    libgtk-3-0 \
    libxss1 libasound2 \
    libdrm-dev \
    libgl1-mesa-glx \
    x11-apps \
    && apt-get autoremove -y \
    && apt-get clean -y

RUN apt-get update && apt-get install -yq --no-install-suggests --no-install-recommends \
    xinit \
    xdg-utils \
    libgdk-pixbuf2.0-0 \
    xserver-xorg-video-dummy \
    xserver-xorg-legacy \
    x11-xserver-utils \
    fonts-liberation \
    fonts-roboto \
    fonts-symbola \
    && apt-get clean && rm -rf /var/lib/apt/lists/*

USER $USERNAME
내용을 살펴 보겠습니다:
FROM mcr.microsoft.com/devcontainers/typescript-node:0-18
- 베이스로 사용할 도커 이미지를 지정하였습니다. 이 이미지는 1편에서 react 를 사용하던 이미지와 동일합니다.
USER root
- 데비안 패키지를 설치하기 위해 root 계정으로 전환 합니다.
ENV DEBIAN_FRONTEND=noninteractive
- apt 패키지 관리자가 설정 관련 질문 프롬프트를 하지 않도록 합니다.
RUN apt-get update -y --no-install-recommends \
    && apt-get install -y --no-install-recommends \
    sudo \
    build-essential \
    xz-utils \
    curl \
    ca-certificates \
    apt-utils \
    dialog \
    git \
    xauth
RUN apt-get update -y --no-install-recommends \
    && apt-get install -y --no-install-recommends \
    libx11-xcb1 \
    libxcb-dri3-0 \
    libgbm1 \
    libxtst6 \
    libnss3 \
    libatk-bridge2.0-0 \
    libgtk-3-0 \
    libxss1 libasound2 \
    libdrm-dev \
    libgl1-mesa-glx \
    x11-apps \
    && apt-get autoremove -y \
    && apt-get clean -y \
    && apt-get clean && rm -rf /var/lib/apt/lists/*
RUN apt-get update && apt-get install -yq --no-install-suggests --no-install-recommends \
    xinit \
    xdg-utils \
    libgdk-pixbuf2.0-0 \
    xserver-xorg-video-dummy \
    xserver-xorg-legacy \
    x11-xserver-utils \
    fonts-liberation \
    fonts-roboto \
    fonts-symbola \
    && apt-get clean && rm -rf /var/lib/apt/lists/*
electron이 사용하는 라이브러리들을 설치해 줍니다. 마지막 x11-apps는 xserver가 제대로 연결되었는지 확인하는 용도로 사용됩니다. 확인이 끝나면 삭제하여도 됩니다.
USER node
다시 개발자 유저로 전환합니다.
컨테이너 다시 시작
Dev Container를 커스터마이징 하였으니 vscode 명령 팰럿에서 Dev Containers: Rebuild Container를 시작 합니다.
컨테이너 빌드에 실패하면 .devcontainer 폴더에서 직접 docker-compose.yml를 빌드하면 더 짧은 시간에 오류 피드백을 받고 오류 메시지를 확인 할 수 있습니다:
$ docker compose build
성공적으로 빌드되고 컨테이너가 올라 왔다면 기본적인 테스트를 해보겠습니다.
먼저 호스트의 xserver와 연결이 되었는지 확인 합니다. Dockerfile에서 우리는 x11-apps를 설치하였습니다. xeyes를 실행하여 연결을 확인 하겠습니다:
$ xeyes
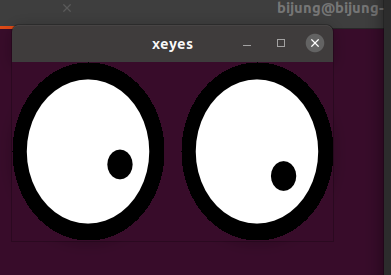
호스트의 화면 어디에선가 마우스 커서를 쳐다보는 두개의 눈이 표시되면 연동에 성공한 것입니다.
ip 주소들을 확인해 보겠습니다:
$ ifconfig
docker0: flags=4099<UP,BROADCAST,MULTICAST>  mtu 1500
        inet 172.17.0.1  netmask 255.255.0.0  broadcast 172.17.255.255
        ...

enx34298f68149d: flags=4163<UP,BROADCAST,RUNNING,MULTICAST>  mtu 1500
        inet 192.168.0.9  netmask 255.255.0.0  broadcast 192.168.255.255
        ...

lo: flags=73<UP,LOOPBACK,RUNNING>  mtu 65536
        inet 127.0.0.1  netmask 255.0.0.0
        ...

wlp2s0: flags=4099<UP,BROADCAST,MULTICAST>  mtu 1500
        ...
enx34298f68149d 를 보면 ip주소가 호스트의 네트워크에 있는 것을 확인 할 수 있습니다.
Electron App 실행하기
$ npm start
많은 오류들이 표시되며 실행 됩니다:
> electron1@1.0.0 start
> electron . --no-sandbox

[732:0311/181448.336014:ERROR:bus.cc(399)] Failed to connect to the bus: Failed to connect to socket /run/dbus/system_bus_socket: No such file or directory
Gtk-Message: 18:14:48.466: Failed to load module "canberra-gtk-module"
Gtk-Message: 18:14:48.469: Failed to load module "canberra-gtk-module"
[732:0311/181448.484852:ERROR:bus.cc(399)] Failed to connect to the bus: Failed to connect to socket /run/dbus/system_bus_socket: No such file or directory
[732:0311/181448.484906:ERROR:bus.cc(399)] Failed to connect to the bus: Failed to connect to socket /run/dbus/system_bus_socket: No such file or directory
[732:0311/181448.487757:ERROR:bus.cc(399)] Failed to connect to the bus: Could not parse server address: Unknown address type (examples of valid types are "tcp" and on UNIX "unix")
[732:0311/181448.487798:ERROR:bus.cc(399)] Failed to connect to the bus: Could not parse server address: Unknown address type (examples of valid types are "tcp" and on UNIX "unix")
libGL error: MESA-LOADER: failed to retrieve device information
libGL error: MESA-LOADER: failed to open amdgpu: /usr/lib/dri/amdgpu_dri.so: cannot open shared object file: No such file or directory (search paths /usr/lib/x86_64-linux-gnu/dri:\$${ORIGIN}/dri:/usr/lib/dri)
libGL error: failed to load driver: amdgpu
libGL error: failed to open /dev/dri/card0: No such file or directory
libGL error: failed to load driver: radeonsi
[757:0311/181448.606465:ERROR:angle_platform_impl.cc(43)] Display.cpp:1014 (initialize): ANGLE Display::initialize error 12289: Could not create a backing OpenGL context.
ERR: Display.cpp:1014 (initialize): ANGLE Display::initialize error 12289: Could not create a backing OpenGL context.
[757:0311/181448.606696:ERROR:gl_display.cc(504)] EGL Driver message (Critical) eglInitialize: Could not create a backing OpenGL context.
[757:0311/181448.606771:ERROR:gl_display.cc(917)] eglInitialize OpenGL failed with error EGL_NOT_INITIALIZED, trying next display type
[757:0311/181448.608538:ERROR:angle_platform_impl.cc(43)] Display.cpp:1014 (initialize): ANGLE Display::initialize error 12289: Could not create a backing OpenGL context.
ERR: Display.cpp:1014 (initialize): ANGLE Display::initialize error 12289: Could not create a backing OpenGL context.
[757:0311/181448.608781:ERROR:gl_display.cc(504)] EGL Driver message (Critical) eglInitialize: Could not create a backing OpenGL context.
[757:0311/181448.608902:ERROR:gl_display.cc(917)] eglInitialize OpenGLES failed with error EGL_NOT_INITIALIZED
[757:0311/181448.609488:ERROR:gl_ozone_egl.cc(23)] GLDisplayEGL::Initialize failed.
[757:0311/181448.611370:ERROR:viz_main_impl.cc(186)] Exiting GPU process due to errors during initialization
[732:0311/181448.614186:ERROR:bus.cc(399)] Failed to connect to the bus: Could not parse server address: Unknown address type (examples of valid types are "tcp" and on UNIX "unix")
libGL error: MESA-LOADER: failed to retrieve device information
libGL error: MESA-LOADER: failed to open amdgpu: /usr/lib/dri/amdgpu_dri.so: cannot open shared object file: No such file or directory (search paths /usr/lib/x86_64-linux-gnu/dri:\$${ORIGIN}/dri:/usr/lib/dri)
libGL error: failed to load driver: amdgpu
libGL error: failed to open /dev/dri/card0: No such file or directory
libGL error: failed to load driver: radeonsi
[802:0311/181448.743752:ERROR:angle_platform_impl.cc(43)] Display.cpp:1014 (initialize): ANGLE Display::initialize error 12289: Could not create a backing OpenGL context.
ERR: Display.cpp:1014 (initialize): ANGLE Display::initialize error 12289: Could not create a backing OpenGL context.
[802:0311/181448.743889:ERROR:gl_display.cc(504)] EGL Driver message (Critical) eglInitialize: Could not create a backing OpenGL context.
[802:0311/181448.743938:ERROR:gl_display.cc(917)] eglInitialize OpenGL failed with error EGL_NOT_INITIALIZED, trying next display type
[802:0311/181448.744822:ERROR:angle_platform_impl.cc(43)] Display.cpp:1014 (initialize): ANGLE Display::initialize error 12289: Could not create a backing OpenGL context.
ERR: Display.cpp:1014 (initialize): ANGLE Display::initialize error 12289: Could not create a backing OpenGL context.
[802:0311/181448.744965:ERROR:gl_display.cc(504)] EGL Driver message (Critical) eglInitialize: Could not create a backing OpenGL context.
[802:0311/181448.744997:ERROR:gl_display.cc(917)] eglInitialize OpenGLES failed with error EGL_NOT_INITIALIZED
[802:0311/181448.745026:ERROR:gl_ozone_egl.cc(23)] GLDisplayEGL::Initialize failed.
[802:0311/181448.746499:ERROR:viz_main_impl.cc(186)] Exiting GPU process due to errors during initialization
MESA-LOADER: failed to retrieve device information
MESA-LOADER: failed to open amdgpu: /usr/lib/dri/amdgpu_dri.so: cannot open shared object file: No such file or directory (search paths /usr/lib/x86_64-linux-gnu/dri:\$${ORIGIN}/dri:/usr/lib/dri)
failed to load driver: amdgpu
[796:0311/181448.849922:ERROR:command_buffer_proxy_impl.cc(128)] ContextResult::kTransientFailure: Failed to send GpuControl.CreateCommandBuffer.
npm notice
npm notice New minor version of npm available! 9.5.0 -> 9.6.1
npm notice Changelog: https://github.com/npm/cli/releases/tag/v9.6.1
npm notice Run npm install -g npm@9.6.1 to update!
npm notice
오류 메시지들은 gtk와 opengl에 대한 내용들입니다. 장기적으로 이 오류들을 제거해 보겠습니다.
이 예제의 소스코드들은 github.com/booiljung/devcontainer-electron2 에 올려 두었습니다.
참조
도커에서 GUI 앱을 구동하는 방법은 다음 글을 참조하였습니다:
- 도커에서 GUI 프로그램 사용하기
- 도커 환경에서 GUI 앱 사용
- docker에서 컨테이너 gui 실행하기
- docker와 GUI 환경 연결
- github.com/bengreenier/docker-x11-electron